
Recently I’ve been thinking about making a textmode demo. If I’m honest this happens about once a year, usually when the results of the annual Text Mode Demo Contest come out. I love that TMDC is helping to keep textmode alive, but I always feel that the demos they attract are, often, just standard 2D or 3D renderers passed through an image to ASCII filter like the impressive TextFX. Now, don’t get me wrong, I love the look of some of these demos. But I do feel like they are missing the point somewhat and I’d love to see some hand painted ASCII art in amongst the filtered stuff. Hopefully I’ll actually be doing something about it this time, but you’ll have to wait and see..
So, I like textmode art. A lot. I also like realtime. A lot. Realtime textmode demos that end up rendered out to a video and shared around as a YouTube linke? Not so much. It’s 2013. We should be able to watch textmode demos in their crisp, “full high-res” glory. And that’s where this article comes in. I’ve been taking a look at getting textmode effects running in a browser. Turns out it’s surprisingly easy even if, like me, you haven’t ever done any serious browser coding. Here.. I’ll show you..
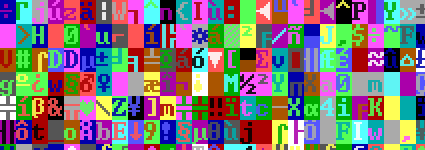
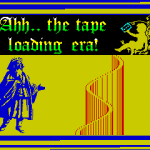
I’m going to jump straight in and show you a proof of concept example. Then I’ll break down the code and explain it a bit. So go ahead and click on the image above to take you to the first example:
The code for this breaks down into three stages: the HTML file, the main program logic and the textmode library. Let’s start off with the simplest: the HTML file.
<html> <head> <script type="text/javascript" src="main.js"></script> <script type="text/javascript" src="textmode.js"></script> <style type="text/css"> canvas { border: 40px solid #000000; } </style> </head> <body onload="init();"> <canvas id="mainCanvas" width="0" height="0"></canvas> </body> </html> |
Nothing complex there then. Just a simple page that loads in a couple of js scripts, hooks in an onload function to run our code and sets up a canvas with a bit of css to give it a border.
Now we’ll take a look at the main program logic bit by bit. This will give us an idea about how to use the textmode library.
// This is our global textmode manager var screenManager; // The font that we will use var sourceFont = new Image(); sourceFont.src = "font.png"; function init() { // Initialise the textmode library screenManager = new TextModeScreen(40, 25, "mainCanvas", sourceFont); // Call our main loop at 25fps setInterval(mainLoop, 1000 / 25); } |
First we have some globals. There’s a screenManager which we set up in init() and use in mainLoop() and there’s a font. The init() function initialise textmode screen to 40 characters wide, 25 characters high, using this MS-DOS bitmap console font and we’ve told it to appear in the canvas we defined earlier. The first interesting bit of code is the mainLoop() function:
function mainLoop() { // Fill the screen with random characters and colours for (i = 0; i < screenManager.charsWide * screenManager.charsHigh; i++) { screenManager.charBuffer[i] = Math.random() * 255; screenManager.colourBuffer[i] = Math.random() * 255; } // Render the textmode screen to our canvas screenManager.presentToScreen(); } |
The textmode screen contains two buffers: one for characters and one for colours. Each buffer is made out of bytes, giving us 256 possible characters and 256 possible colours. The colours are split further using a 16 colour palette and giving us 16 forgeround and 16 background colours per character. What we are doing in this loop is filling both of these buffers with random values and then calling presentToScreen() to copy that to our canvas. You’ve already seen the result.
Now we need to delve into the textmode library itself. This is contained in the textmode.js file. It’s not a huge library, but I’ll break it down into functions. Firstly we have the colour table.
var colourTable = ['#000000', '#0000AA', '#00AA00', '#00AAAA', '#AA0000', '#AA00AA', '#AA5500', '#AAAAAA', '#555555', '#5555FF', '#55FF55', '#55FFFF', '#FF5555', '#FF55FF', '#FFFF55', '#FFFFFF']; |
This defines the 16 colour palette. Remember how I said we have 16 foreground and 16 background colours? This is what they look like (click to see the full thing):
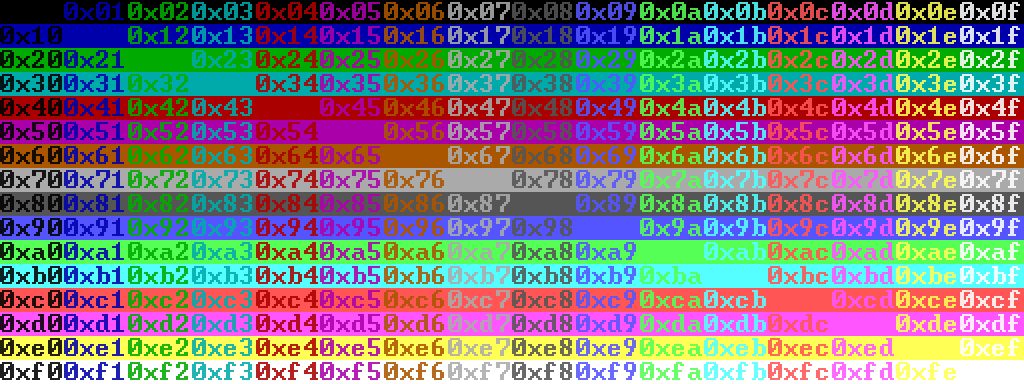
There you see all 256 colours expressed as hex bytes. You’ll notice that you set the foreground using the lower nibble and the background with the upper.
Now comes the biggest piece of code, the set up function for the library:
function TextModeScreen(charsWide, charsHigh, canvasName, sourceFont) { var canvas = document.getElementById(canvasName); if (!canvas) { alert("Failed to find canvas"); return; } this.context2d = canvas.getContext("2d"); if (!this.context2d) { alert("Couldn't get 2d context on canvas"); return; } // Setup canvas size and buffers canvas.width = charsWide * 16; canvas.height = charsHigh * 24; this.charsWide = charsWide; this.charsHigh = charsHigh; this.charBuffer = new Uint8Array(charsWide * charsHigh) this.colourBuffer = new Uint8Array(charsWide * charsHigh) // Create foreground font colours this.colouredFonts = new Array(16); for (i = 0; i < 16; i++) { this.colouredFonts[i] = document.createElement('canvas'); this.colouredFonts[i].width = sourceFont.width; this.colouredFonts[i].height = sourceFont.height; var bufferContext = this.colouredFonts[i].getContext('2d'); bufferContext.fillStyle = colourTable[i]; bufferContext.fillRect(0, 0, sourceFont.width, sourceFont.height); bufferContext.globalCompositeOperation = "destination-atop"; bufferContext.drawImage(sourceFont, 0, 0); } } |
We already know that you pass in the size and name of the canvas and the font. In this demo the font is hardwired to be 16 pixels wide by 24 high but that’s easy to change. The init() function first gets hold of a 2D context for the canvas. Next it calculates and sets the canvas size and create a couple of byte sized arrays for the character and colour buffers that we talked about earlier. Finally we make 16 copies of the font, each in a different colour. The source font is white on a transparent background so we can easily create tinted version of it using “destination-atop” image blending. The reason for creating these copies will become clear when we look at the next function, presentToScreen():
TextModeScreen.prototype.presentToScreen = function() { var readPos = 0; var sy = 0; for (y = 0; y < this.charsHigh; y++) { var sx = 0; for (x = 0; x < this.charsWide; x++) { var charId = this.charBuffer[readPos]; var colourId = this.colourBuffer[readPos]; readPos++; var cx = (charId & 0x0f) * 16; var cy = (charId >> 4) * 24; this.context2d.fillStyle = colourTable[colourId >> 4]; this.context2d.fillRect(sx, sy, 16, 24); this.context2d.drawImage(this.colouredFonts[colourId & 15], cx, cy, 16, 24, sx, sy, 16, 24); sx += 16; } sy += 24; } } |
What we do here is go through the character and colour buffers and render them to the canvas. This has to be done in two steps for every character. First we render the background colour. This is easily drawn with a fillRect() of the appropriate colour. Then we render the font on top in the foreground colour. However, we can’t tint this character to make it the colour we need. Luckily we created a different copy of the font for each of the 16 colours, so we can simple overlay the appropriate character from the correctly coloured font. Repeat for all characters in the buffer and we’re done.
That’s the main part of the library dealt with, but there are a couple of additional utility functions: print(), printBox() and processBox(). The first two are fairly obvious and quite trivial so take a look at the code yourself and see if you can follow it. The third one however:
TextModeScreen.prototype.processBox = function(x, y, w, h, func) { for (sy = y; sy < y + h; sy++) { if (sy >= 0 && sy <= this.charsHigh) { var readWritePos = x + sy * this.charsWide; for (sx = x; sx < x + w; sx++) { if (sx >= 0 && sx <= this.charsWide) { var charId = this.charBuffer[readWritePos]; var colourId = this.colourBuffer[readWritePos]; var results = func(charId, colourId); this.charBuffer[readWritePos] = results[0]; this.colourBuffer[readWritePos] = results[1]; } readWritePos++; } } } } |
This is an interesting function. You pass in a box (defined by x, y, width and height) and a function. The function is then called for every character inside the box, with the character and colour as arguments. The function should return an array containing a new character and colour pair. You can use these to do neat character or palette changing effects like greyscale, shadow or upper/lower case conversion. Think of it as a simple shader for textmode. Feel free to expand upon it..
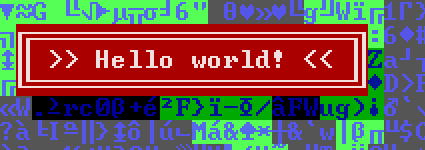
Putting this all together I’ve created a (very slightly) more complex example. You’ll find examples of print(), printBox() and processBox() (used to create a drop shadow) in here:
That last example is bundled up with the textmode library and supporting files and can be grabbed from here: Javascript textmode library
Now all you need to do is make something cool with it. And that’s what I’ll be doing too ;)
Disclaimer: You should consider this as sample code to be built upon. It’s meant to be clear rather than optimal. You should use requestAnimationFrame() instead setInterval(). It won’t work in all browsers as it stands. Also, I’m no Javascript expert.


I totally sign what you said about todays textmode demos look like 3d demos squashed through an ascii renderer (well, because, they are just that).
but while utilizing a browser seems like a smart idea to make it as cross platform as possible it still feels like “fake text mode” to me, even if the same restrictions apply.
dunno if theres a good solution that isnt platform/os specific, probably not without hacking some sort of textmode-client together.
if there was something like telnet/ssh with sound and buffering on the other hand…
anyway, im not a coder but everything supporting textmode is good and your approach is something fresh, so kudos all the way \o/!
Hi Paul! Nice looking trick :-)
However, I was expecting you to create a bunch of div’s in a tabular arrangement, with color and background and a monospace font, and change the innerHTML of said divs on the fly. Any reason why you went the canvas way?
Hey sole..
I come frame a frame buffer background rather than an HTML one – the div’s approach didn’t even occur to me! Guess it would be more “compatible” but I think I’d have less font control? The canvas approach also gives me the opportunity to easily do some funky things with images and overlays that break the textmode boundaries.
Cool use of the BIOS font to make a demo. I’ve been doing a similar thing with UDG (User Defined Graphics) using 8*8 blocks using a Canvas and JavaScript.
Ooops, my HTML background betrayed me!! O:-)
It was just curiosity, I thought maybe you’ve tested it but found some of the lack-of-control issues you point at. Might be interesting to do a test :-)
Loving this retro stuff ! Nice work. You should knock up a version of qbasic nibbles (or snake) using it :-)
Couldn’t help myself but build something with this. This is a really fun library.
http://jkosoy.com/experiments/20130201_001/
Cute little library! <3
Used it to do a quick oldschool cycling effect : http://www.cambus.net/character-and-color-cycling-effect-in-javascript/
Hope to do more someday! :)
Pingback: A bit more textmode fun | evilpaul.org
Interesting – considering I’ve been working on some ansi/ascii viewing stuff for a bit, and started with escapes.js – https://github.com/atdt/escapes.js – which I found about 2 weeks before your post.
I’ve mangled it a fair bit now for the viewer (multiple fonts, etc) and the only reason I came across your post was I was looking for Cleaner’s old Ansi font – the styled one – and can’t find it on his Ansilove area.
Course the viewer’s main that I’m messing around with are user interface, which for a demo is, well, you know (: Mind you I’m also looking at tablet use of the viewer, which adds some complexities for the keyboard control I have now.
Anyway we should discuss stuff in this area, I will prolly throw my “release candidate” at Gasman soon in order to check it out prior to Revision (where I will be using it (: )
Pingback: Is this Animal Romantics? | evilpaul.orgevilpaul.org