
One of the reasons I wanted to use a canvas (rather than tables of characters) for my textmode library is that is allows you to easily mix in normal 2D graphics and use effects like transparency. This post is a quick example to show how this sort of thing can work. Click on the image below to see what it looks like and then I’ll delve into the method behind it:
There are obviously a couple of extra things going on here, but it all boils down to using multiple layers on the canvas. Instead of just one textmode layer I’ve added an overlay and a background, giving me three layers in total:
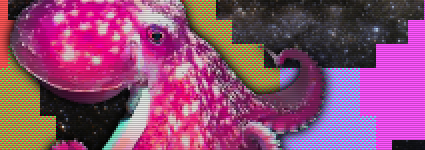
Layer 1: Background

This is just a static image, nothing special here.
Layer 2: Textmode
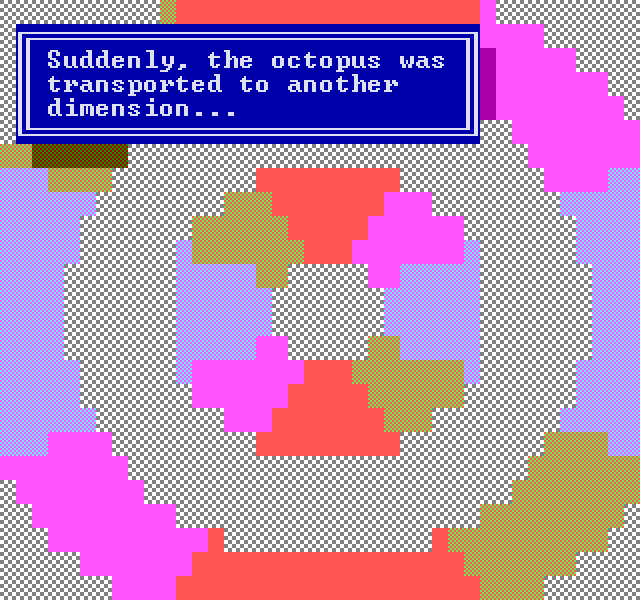
This is where our action is, and this is also where a small addition is needed to the textmode library. I’ll go into detail on this later, but the addition basically allows us to have some part of the textmode layer appear transparent so that the background layer can be seen.
Layer 3: Overlay

Again, this is just a static image. Note that every second line of this image is a feint black line. I basically added a layer in Photoshop with solid black 1px high lines every other line, and then set the whole thing to about 20% opacity. When this is overlaid on top of everything else it gives a retro scanline effect. This kind of “post-processing” effect, when applied over all other layers, can really help to tie everything together.
So how does all of this work in practice? Let’s look through the new stuff in main.js and textmode.js. I’m only going to highlight the important parts, so if you haven’t already read my first post on textmode then head on over and do that now.
The first change is to load in a couple of images:
// Background and overlay images. These are the same size as the canvas so that they don't get // stretched or shrunk var background = new Image(); background.src = "background.png"; var overlay = new Image(); overlay.src = "overlay.png"; |
Next we draw the effect and the text box. I’ll skip over this as it’s similar to the previous examples (you can examine the code yourself) apart from one important part. In the rendering loop for the effect you’ll see that we conditionally set the background colour to ‘0x00’, or black ink on black paper. This is a special colour code that I’ve designated to mean that the textmode cell is transparent. When we come to render the textmode layer to the canvas with presentToScreen() it’ll skip over all of these specially coloured cells, allowing the underlying image to show through.
Finally, we draw the three layers. Remember that the first and last layers are just images, so we use drawImage() to copy these to the canvas. The middle layer is our textmode layer, so we’ll use the old presentToScreen() method. This time, though, we’ll add an extra argument of ‘0x00’. This tells the function to treat our special colour as transparent.
// Render the background, then the textmode buffer, then put the overlay on top screenManager.context2d.drawImage(background, 0, 0); screenManager.presentToScreen(0x00); screenManager.context2d.drawImage(overlay, 0, 0); |
The next change is in the textmode library itself. I’ve altered the presentToScreen() function to take an optional argument – a mask colour. The function now has two control paths: one with a mask colour and one without. If you don’t pass a mask colour in then it renders exactly as it did before. If you do then it’ll skip rendering of any cells that have that mask colour. The code looks like this:
TextModeScreen.prototype.presentToScreen = function(maskColour) { if (typeof maskColour === "undefined") { // Copy straight to the screen with no masking var readPos = 0; var sy = 0; for (y = 0; y < this.charsHigh; y++) { var sx = 0; for (x = 0; x < this.charsWide; x++) { var charId = this.charBuffer[readPos]; var colourId = this.colourBuffer[readPos]; readPos++; var cx = (charId & 0x0f) * 16; var cy = (charId >> 4) * 24; this.context2d.fillStyle = colourTable[colourId >> 4]; this.context2d.fillRect(sx, sy, 16, 24); this.context2d.drawImage(this.colouredFonts[colourId & 15], cx, cy, 16, 24, sx, sy, 16, 24); sx += 16; } sy += 24; } } else { // Copy to the screen unless the colour is the same as the mask colour var readPos = 0; var sy = 0; for (y = 0; y < this.charsHigh; y++) { var sx = 0; for (x = 0; x < this.charsWide; x++) { var charId = this.charBuffer[readPos]; var colourId = this.colourBuffer[readPos]; readPos++; if (colourId != maskColour) { var cx = (charId & 0x0f) * 16; var cy = (charId >> 4) * 24; this.context2d.fillStyle = colourTable[colourId >> 4]; this.context2d.fillRect(sx, sy, 16, 24); this.context2d.drawImage(this.colouredFonts[colourId & 15], cx, cy, 16, 24, sx, sy, 16, 24); } sx += 16; } sy += 24; } } } |
You should clearly be able to see the two control paths there – one for masked rendering and one for non-masked.
So that’s that – a nice extension to my textmode library and an example of how to use it. I’ve updated the textmode library zip file to include the code for all three examples. You can grab it from here: Javascript textmode library and examples
Now, what next? Well, there are plenty of possibilities. How about a textmode puzzle game where your progress reveals an image underneath? But what should I do next? I’d love to hear your thoughts on what else I should add to this library ;)


Be cool to add simple audio stuff for doing chiptunes but not just playing a single audio file in the background but something more like playing notes. Not quite sure how you’d do that other than pre generate wav files for different notes/instruments, load em with audio tag and play them together. hrmm ;)
I know I’m going to sound annoying but… github!!! github your examples!!! Maybe I’ve grown lazy, but the idea of downloading a zip with code is really not compelling anymore–I’d rather look at the source code online, and if I like it I can clone it (or download the ZIP that github builds for you) :-)
Also, I was wondering whether you’d look into optimising any of this code. For example, keeping a local reference to object properties before using them on a loop. E.g. instead of using “this.context2d” all the time in the loop, you’d create a local
var context = this.context2d;and use it in the loop.That generally helps a little bit getting things a bit faster with JS. Unless the browser is optimising it too nowdays…!
Oh, also another trick I’ve used sometimes for adding the overlay: just add a DIV on top, with the overlay image as background (an alternating stripe/transparent line pattern) :-)
frenzy:
I’d love to write a nice audio library. Not sure if any already exist? I got the impression that audio wasn’t quite mature in HTML5 yet?
sole:
github.. yes.. I see your point. I’ll see what I can do
optimisaion.. another good point. This version of the library is a “tidied up” copy of my dev library. The dev library is actually slightly different and I didn’t think about optimising as I converted to this version. I’ll do that in the next update
extra div layers.. Yes! I meant to mention this method at the bottom of the post. Thanks for reminding. There’s simple example on Stack Overflow.
One could start thinking about a port of the ZZT engine to javascript with this…
Pingback: â–º Animal Romantics | CHIPFLIP